Monday 28 April 2014

Valentine's Day Gift Box

Hello friends...

I have a very pretty gift box to share with you all today...
It is based on love theme... I made this for valentines day...
So finally I am trying to post all the projects I made in the last few months... :)


I have used lots of pink in this one... & I have used some die cuts, embossing, inking, stamping, pearls, ribbon & my handmade roses to embellish it...


The cylindrical box opens up to reveal 2 compartments which can be filled up with chocolates or small gifts..
I hope you like it  :)


Entering in:
Crafters Corner : Go 3D ( I was the Winner.. yayyy  )

Sunday 27 April 2014

Pocket Fold Card

Hello friends...

I hope you enjoyed the IBS & DV blog hop ... All the projects were so inspiring....
& a big thanks to everyone who left the comments... love all the encouragement & appreciation  :)
& if you have not yet joined the blog hop then there is still some time left...Click HERE to join in the fun & be entered for the huge $100 prize  :)

Now moving on to my new card...
I have made a pocket fold card with a tag to write message on...
I die cut the borders, doily & other embellishments & assembled my card...
The front has a details pp with rose... & the pp on the inside & the tags are plain so I used few stamps  from Spring Lilacs stamp set with matching ink to decorate them & add some details ... I lobe how beautiful it looks & matches with the pp design on the front.. 

I have used the sentiment stamp from Everyday Greetings  & stamped it in dark brown ink on the tag... 
Here is a closeup of the stamping done on the tag...
Thank you for visiting...


Friday 25 April 2014

Inspired by Stamping & Die-Version Blog Hop


Hi everyone! 
Welcome to the Inspired By Stamping and Die Versions Blog Hop. Twenty two talented designers have united to celebrate the new season and shake off the malaise of a snowy winter. Yay!!! Inspired by Stamping, which designs and manufactures the highest quality of photopolymer stamps that bring superior stamping to all crafters, has teamed up with Die-Versions, makers of low profile metal dies which works with virtually every machine out there and cuts through most materials, to create this special eye candy of Spring themed projects.

One lucky "hopper" will get a total prize package of $100 in gift certificates, a $50 gift certificate from Inspired by Stamping AND Die-Versions, so you can stock up on some awesome products that both of these companies have to offer.
For your chance to win the grand prize, visit all of the participating blogs, leaving a comment at each, then leave a comment telling us what you like the most about Spring at the Inspired By Stamping blog. All comments entered between now and April 28th at 10 pm (Pacific time) will be eligible for the grand prize.

Now moving on to my project for this blog hop...

I have made a spring theme photo holder..
As soon as I saw these Die-Version's dies I knew I will make a photo frame of sorts...And here is what I came up with...

The base is an old cup I had... I broke its handle & covered it up with black & white polka dots washi tape...
I added some black jute twine at the bottom & hand dyed pink lace on the top...
I adhered a styrofoam ball inside & covered it up with scrunched up dark green paper stripes....
Next I added 3 bamboo sticks in the center & decorated the base with flowers & pollens...
I have added pink wooden clothes pin to the end of two of the taller bamboo sticks to hold my photoframes & I have added a sentiment on the shorter one...
To make the sentiment frame I cut 4 cardstocks with a die from IBS Fancy Labels 2 Die & adhered them on top of each other ... next I used a smaller die from the same set to die cut a panel from white cardstock with a strip of washi tape on top & adhered it one top of black frame...
Then I used a sentiment from IBS Everyday Greetings stamp set for the sentiment, heat embossed it & inked the panel with pink ink to match with the other embellishments...
I have used  Die-Version Sweet Frames - Amazing Die-Version Sweet Frames - Good times to create my photo frames... I die cut black cardstock 4 times with each die to create the front panel, stacked & adhered them... Next I cut 6 thin strips of black cardstock & adhered them on 3 sides of both the frames keeping them flush with the outer edge... This was done to make a gusset to insert the photographs...
I wanted  it to look pretty even when there was no photograph inside so I cut a white cardstock & inked it with pink ink...Then I took the gorgeous floral stamp from  IBS Mother's Day Bouquet & stamped it on the pink panel.. I also heat embossed it for some added effect...I adhered this to the thin stripes on the 3 sided of the frame & added another piece of black cardstock on the back... I embellished the frames with some grey rhinestones for a finishing touch...
Here you can see how this frame works... the photographs can be easily changed by sliding them in from the top... Don't you just love these cute little frames  :)
& these are so easy & fun to create with the new Die-Versions dies...
I hope you liked my project...
Don't forget to leave a comment to be eligible for the grand prize...

Your next stop on the hop is Rebecca Deeprose and if you ever get lost in the hop you can always go to Die-Versions blog for the complete order list.

Supplies used :


Wednesday 23 April 2014

A Friend is Someone

Hello friends,

Most of you who follow my Fb page know that I went on few holidays this month & now I lots of projects have piled up & I am trying to complete all of them before deadline...
So this is just a quick post to share a new card I made with IBS stamps...
The sentiment is from Everyday Greetings... This set has some great sentiments for lots of occasions...


I will be sharing more projects soon in between crafting breaks..  :)
So stay tuned....
I have 1 more great news for all of you... IBS & Die-version are teaming up for a blog hop this weekend & we have lots of fabulous inspirations & prizes in store for you... So don't forget to visit & hop along with us  :)


IBS Products :

Everyday Greetings


Thursday 17 April 2014

A Bouquet of Flowers

Hello friends...

Today I am here to share a new card I made with IBS  Mother's Day Bouquet stamp set..
I love the floral bouquet image from this stamp set...& decided to use it on this new card..
I usually like to use bright colors but this time I decided to go with the softer colors...

I colored in the image with some soft distress ink colors & cut it in oval.
Next I die cut a decorative oval frame & inked it.. I adhered the colored image in the frame & decorated it with pearls... I die cut 2 more pieces for the background & inked them with soft pink color...I attached the bigger die cut on the pattern paper & used foam adhesive to layer the smalller one on top...Then I adhered the floral frame on top with some more foam adhesive...


I have added some pearl dots around the colored image to add a little more interest...


I decorated one corner of the frame with some handmade flowers.. & the opposite corner with a glittered butterfly...


I have added some more pearls & rhinestones to to the die cuts to dress up the card...
Thank you for visiting... see you soon with my next post...
IBS Products :

Friday 11 April 2014

Good Friends

Hello friends...
Just a quick post to share my new card...
I made a very simple card with focus on the sentiment from Everyday Greetings stamp set...
 I have used embossed & inked cardstock for the background & the sentiment is adhered on a die cut & inked panel...
 I have used purple perfect pearls for the pearly shimmer on the die cut panel for the sentiment...
 I hope you can see the gorgeous shimmer...
I have embellished the card with some rhinestones, ribbon & lace...
Thank you for visiting...
IBS Products :

Everyday Greetings

Wednesday 2 April 2014

Always Remember

Hello friends...

Has it ever happened to you that you have to write a note & you can't find a pen or paper...
I had faced this in the past but after I started using my magnetic post-it-notes I always know where to find something to write my little notes or add to my grocery list... :)

When my last  post-it-note got over I decided to make a new one instead of refilling it... small perks of being a crafter... I get to make & use new  things :D

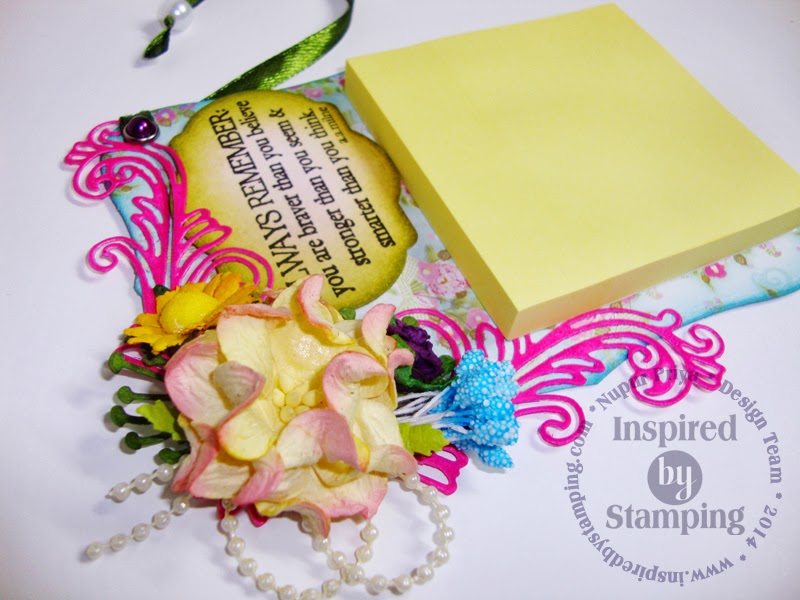
So here is the new design that I made... 
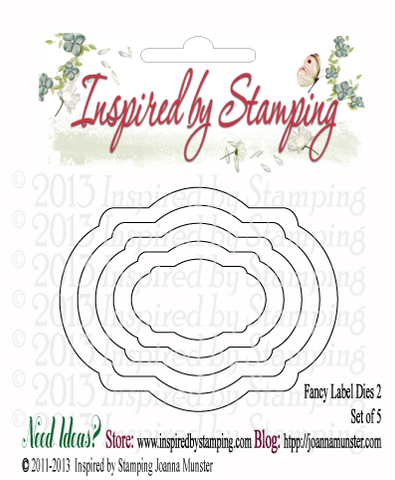
I have used a die cut pattern paper & chipboard for my base ... I used 2 strips cut from magnetic sheet on the back.. I wanted to make it a little inspirational so I die cut a card stock with a medium sized die from Fancy Labels 2 Die, inked it & stamped the sentiment from Everyday Greetings... This is a great stamp set with some great paragraph sentiments for various occasions...

I needed a place for my pen so that I don't have to go searching for a pen everytime I had to jot down something...
I decided to hang the pen with the help of a ribbon... I punched a small hole in the top corner, threaded the ribbon through it & used a pearl brad to secure it & also to hide the hole...
I have threaded a pearl through the other end of the ribbon & secured with a knot.. this helps to hang my pen nicely ... & it can fit any size as long as the have this clip thing  :D

 I love flowers so I decorated it with a die cut flourish corner, some flowers & string of pearls.
I can easily use another post-it-note to refill this when it gets over.. or create a new one if I get bored with this one  ;)

I hope you like my little project