Wednesday 24 June 2015

Poppy Vase Card

Hello friends & welcome to another Heartfelt Creations Wednesday... 
Today I am sharing a card with lots of layers & stamping...


Products Used:

Other Products:
Crushed Olive, Shabby Shutters, Forest Moss, Gathered Twigs, Walnut Stain, Vintage Photo, Mowed Lawn, Black Soot, Salty Ocean, Spun Sugar & Worn Lipstick Distress Inks, Black Archival Ink, Memento Tuxedo Black Ink, Art Anthrology Metal Effects - Copper Dimentional Medium, Memory Box Rhapsody Stencil, Tim Holtz Woodgrain stencil,Ebosser, Martha Stewart scoreboard, white & watercolor cardstock, Koi Waterbrush, pearls & blue seed beads.

Project Instruction:

Take a 6" x6" card base, stamp the image from Blazing Poppy Vase Cling Stamp Setwith Black Archival ink on the right corner & color with Distress inks. Color the vase with Art Anthrology Metal Effects - Copper Dimentional Medium. Stamp the Birds and Blooms Collage Cling Stamp Set with Gathered Twigs Distress ink several times. Ink the card front with Gathered Twigs & Vintage Photo Distress inks. 

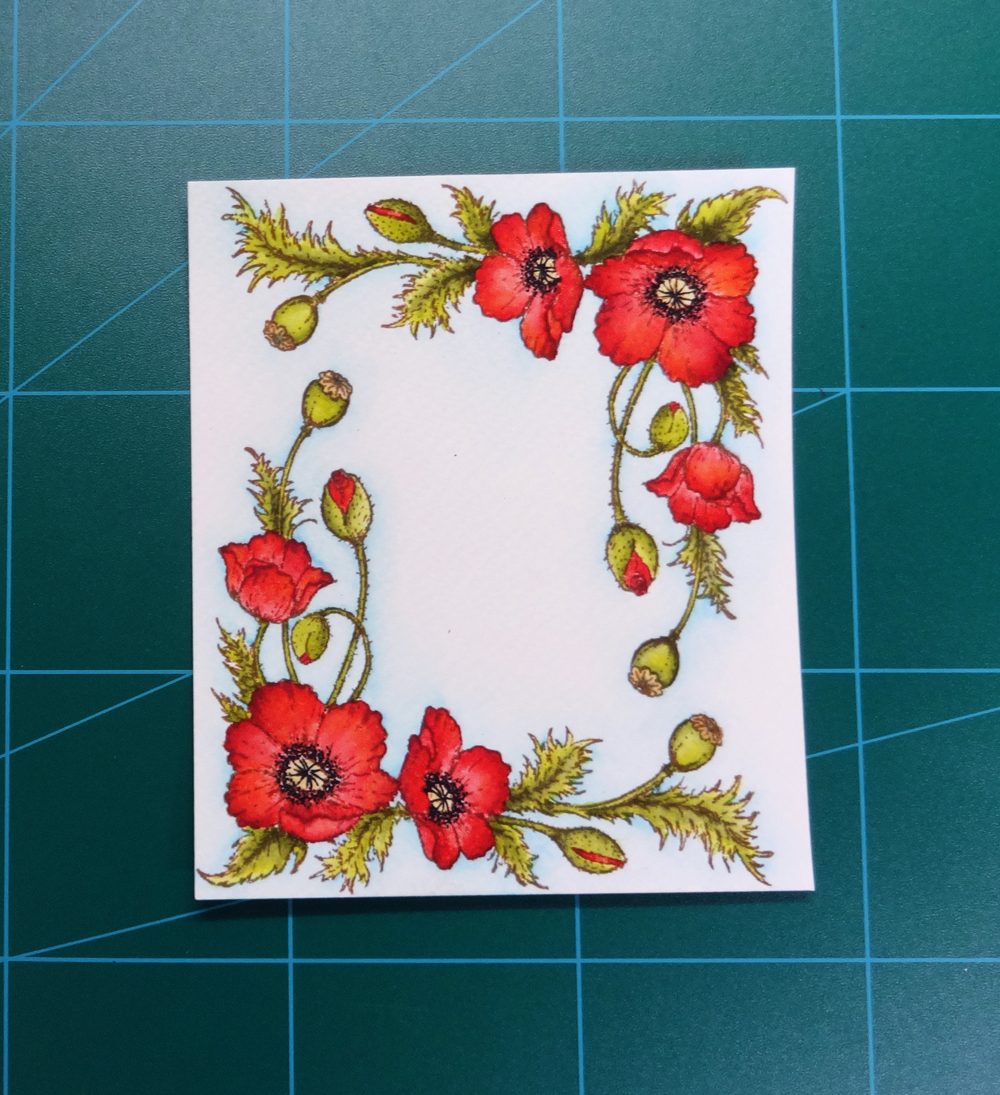
Take a 4" x 5 1/4" white card base & stamp the second image from Blazing Poppy Vase Cling Stamp Set several times with Memento Tuxedo Black Ink ( stamp off the stamp after inking once on a scrap piece of paper & then stamp on the final panel). Ink it lightly with Black Soot Distress Ink. Take a piece of white cardstock & Memory Box Rhapsody Stencil & ink with Shabby Shutters & Forest Moss Distress Inks. Take another piece of cardstock & Tim Holtz Woodgrain stencil & ink with Gathered Twigs, Vintage Photo & Walnut Stain  Distress Inks. Cut them into banner shapes & adhere them to the grey background & adhere thefinished panel to the card base with foam adhesive.

Cut a piece of white cardstock with Decorative Lace Border Die, trim it down to 1 1/4" x 6" piece, ink with Spun Sugar & Worn Lipstick Distress Inks & adhere to the background as shown.

Stamp the flowers from the Botanical Rose Cling Stamp Set with Salty Ocean Distress Ink, cut it out with Botanical Wings Die & ink with same ink. Stamp the leaves from Fluffy Birdies  Cling Stamp Set with Forest Moss Distress ink, cut it out with Birds & Bloom Die & ink with Crushed Olive & Forest Moss Distress Inks. Shape them with Deluxe Flower Shaping Kit. Glue some blue seed beads in the flower centers. Arrange & adhere them to the card base as shown. Add some pearls to finish.


Monday 22 June 2015

Blazing Poppies Tutorial

Hello friends...

Today I have a new tutorial for you all made with the Heartfelt Creations Blazing Poppies Collection...
Products Used:
HCPC-3674 Blazing Poppy Petals Cling Stamp set 
HCPC-3675 Poppy Corner and Border  Cling Stamp set 
HCPC-3678 Blazing Poppy Fillers  Cling Stamp set 
HCPC-3656 Delightful Daisies Cling Stamp Set
HCPC 3354 Classic Message Cling Stamp Set
HCD1-764 Blazing Poppy Die
HCD1 713 Decorative Lace Border Die
HCD1-760 Delightful Daisy Die
HCST1-401 Deluxe Flower Shaping Kit

Other Products

Crushed Olive, Forest Moss, Barn Door, Spiced Marmalade, Aged Mahogany, Scattered Straw, Salty Ocean,  Gathered Twigs & Brushed Corduroy Distress Inks, Black & Coffee Archival Ink, Ebosser, Spellbinders Labels Four Dies, Martha Stewart scoreboard, black, white & watercolor cardstock, Pearls & seed beads.

Project Instruction:
Step 1)  Stamp the Poppy Corner image from Poppy Corner and Border  Cling Stamp set on a 4 1/4" x 5"watercolor cardstock twice as shown with Coffee Archival ink.

Step 2) Color in the background with Salty Ocean Distress Ink, flowers with  Barn Door, Spiced Marmalade & Aged Mahogany Distress Inks & the leaves with Crushed Olive & Forest Moss Distress Inks. Add the pollen with a fine tip black pen.

Step 3) Mark the center of the panel with pencil, position the Spellbinders Labels Four Die to cut out a hole.

Step 4) Die cut the colored panel & Decorative Lace Border Die with white cardstock ( I ended up using only one die cut).

Step 5) Stamp the sentiment from the Classic Message Cling Stamp Set on a piece of white cardstock with Black Archival Ink.

Step 6) Ink the edges with Brushed Corduroy Distress Ink.

Step 7) Take a 6" x 6" top folding white card base & ink the edges with Brushed Corduroy Distress Ink. Now stamp the tree image from  Blazing Poppy Fillers Cling Stamp Set randomly with Gathered Twigs Distress Ink.

Step 8) Adhere the Decorative Lace Border Die cut on the card base on the right. Adhere the sentiment panel behind the colored panel with foam adhesive & mat it on slightly larger black cardstock. Adhere it to the card base.


 Step 9) Stamp Blazing Poppy Petals Cling Stamp Set & the leaves from Delightful Daisies Cling Stamp Set with Coffee Archival Ink on white cardstock. 
Step 10) Cut the stamped images using Blazing Poppy Die & Delightful Daisy Die.

Step 11) Ink the leaves with Crushed Olive & Forest Moss Distress Inks & the poppy petals with Barn Door & Spiced Marmalade Distress Inks.

Step 12) Shape the petals & leaves with  Deluxe Flower Shaping Kit. Adhere 2 petals together & glue 1 pearl & some seed beads to the flower center.


Step 14) Assemble & adhere the poppies & leaves on the right side of the card.


Sunday 21 June 2015

Bloom in Love

Hello friends...

Welcome to IBSIC Designer inspiration... 
I have made a card for IBSIC #95 using the sketch & string. { Please excuse the bad photography... it has been raining continuously here in Mumbai & its difficult to get good natural light for photographs...  :(   }


 I have used the Spring Bouquet stamp & the sentiment from the Tulip Bouquet stamp set for my card.
Hope you like it... Thank you for visiting  :)


Wednesday 17 June 2015

Blue Poppy Card

Hello friends...

Welcome to Heartfelt Creations inspiration post...
Today I am showcasing the beautiful Blazing Poppy Stem Cling Stamp Set from the latest release & I hope you like it  :)


Products Used:
Other Products:
Crushed Olive, Mowed Lawn & Salty Ocean Distress Inks, Black Archival Ink, Versamark Ink, Ebosser, Spellbinders Reflective Moments Die, Martha Stewart scoreboard, white & watercolor cardstock, Koi Waterbrush, WOW White Embossing Powder, Ranger Gold Embossing Powder, Ranger Heat-it Tool, Black Glitter, Pearls & Rhinestones.

Project Instruction:
Stamp the Poppy image from Blazing Poppy Stem Cling Stamp Set with Black Archival Ink on a piece of watercolor cardstock & color with Distress Inks. Add a drop of liquid glue in the Poppy center & adhere a little black glitter. Trim this piece to 2 5/8" x 4 1/4", distress the edges, dab with Versamark ink, sprinkle with gold embossing Powder & heat emboss. Take another piece of white cardstock slightly larger than this panel & repeat the whole process on the edges. Adhere the colored panel on top with foam adhesive.

Take a piece of 5" x 6 3/4" white cardstock, ink with Crushed Olive & Mowed Lawn Distress Inks & stamp Poppy image from Blazing Poppy Stem Cling Stamp Set with Mowed Lawn Distress Ink several times. Stamp the Birds and Blooms Collage Cling Stamp Set with Versamark ink sevaral times to cover the panel & heat emboss with WOW White Embossing Powder. Now die cut this panel & a piece of white cardstock with Spellbinders Reflective Moments Die. Score the top edge of the white die cut at 1 1/4" & adhere it to the back of colored die cut till the score line. Adhere the watercolored Poppy panel to this card base as shown & embellish with pearls & rhinestones.


Thank you for visiting today...

Friday 12 June 2015

Thanks a Bunch

Hello friends... 
Today I have made a thanks you card with Spring Bouquet  &  Flower Of The Month: Easter Lily stamp set...
 For the floral background I stamped the Easter Lily stamp from Flower Of The Month: Easter Lily stamp set several times & colored them with Distress Inks. Next I cut the white panel to layer on top of my background, stamped my sentiment from Spring Bouquet stamp set...  & added some pearls.

Hope you like my card... Thank you for visiting today  :)


Wednesday 10 June 2015

Blazing Poppy Card

Hello friends...

Today is second Wednesday of the month which means the debut of a new collection by Heartfelt Creations....

Blazing Poppies

Has the humdrum of the daily grind sapped your energy and stunted your creative mojo?  Rejuvenate your creativity with the saturated colors and resplendent artwork of the Blazing Poppies Collection of stamps, dies and designer papers from Heartfelt Creations.  Escape to verdant fields where dancing poppies sway like ballerinas wearing dramatic hues of blush, coral, peach, scarlet and ebony.  Let this glorious canvas of flowing script, heirloom lace, ornate flourishes, flower laden arbors, bold stripes and soft neutral backgrounds enliven your senses and awaken your inner Van Gogh.  The Blazing Poppy stamp and die allows you to fashion bold, life-like poppies in every size and color.  You'll design museum worthy backgrounds, card focals, layouts and home décor with the sumptuous stamps and paper collection.  Create your own masterpiece, and spark your imagination with the amazing artistry and uncommon brilliance of Blazing Poppies.

I have made a card with this beautiful collection... The colors of this new collection are bright & the images are gorgeous... 
I hope you like it  :)


Products Used:
HCD1-764 Blazing Poppy Die

Other Products:
Crushed Olive, Forest Moss, Barn Door, Spiced Marmalade, Aged Mahogany, Scattered Straw, Salty Ocean,  Gathered Twigs & Brushed Corduroy Distress Inks, Black & Coffee Archival Ink, Ebosser, Spellbinders Labels Four Dies, Martha Stewart scoreboard, black, white & watercolor cardstock, Pearls & seed beads.

Project Instruction:
Take a 6"x6"  top folding white card base & ink the edges with Brushed Corduroy Distress Ink. Now stamp the tree image from  Blazing Poppy Fillers Cling Stamp Set randomly with Gathered Twigs Distress Ink. Die cut a piece of white cardstock with Decorative Lace Border Die. Adhere it on the card base on the right.

Stamp the Poppy Corner image from Poppy Corner and Border Cling Stamp set on a 4 1/4" x 5" watercolor cardstock twice as shown with Coffee Archival ink. Color in the background with Salty Ocean Distress Ink, flowers with  Barn Door, Spiced Marmalade & Aged Mahogany Distress Inks & the leaves with Crushed Olive & Forest Moss Distress Inks. Add the pollen with a fine tip black pen. Mark the center of the panel with pencil, position the Spellbinders Labels Four Die to cut out a hole. Stamp the sentiment from the Classic Message Cling Stamp Set on a piece of white cardstock with Black Archival Ink. Ink the edges with Brushed Corduroy Distress Ink. Adhere the sentiment panel behind the colored panel with foam adhesive & mat it on slightly larger black cardstock.Adhere it to the card base. 

Stamp Blazing Poppy Petals Cling Stamp Set & the leaves from Delightful Daisies Cling Stamp Set with Coffee Archival Ink on white cardstock. Cut the stamped images using Blazing Poppy Die & Delightful Daisy Die. Ink the leaves with Crushed Olive & Forest Moss Distress Inks & the poppy petals with Barn Door & Spiced Marmalade Distress Inks. Shape the petals & leaves with  Deluxe Flower Shaping Kit. Adhere 2 petals together & glue 1 pearl & some seed beads to the flower center. Assemble & adhere the poppies & leaves on the right side of the card as shown.


Wednesday 3 June 2015

Friends are the Family You Choose

Hello Friends...

Nupur here from Nupur Creatives to share a card featuring  Flower Of The Month: Easter Lily stamp set. I love the flower images in this stamp set.
To make my focal point I stamped the Lily Bouquet stamp from Flower Of The Month: Easter Lily stamp set with black archival ink several times & then colored it with watercolor pencils. I matted it on black cardstock & adhered it to my card base.

 I also stamped the same stamp once  on the card base just below where my sentiment would go.
I stamped the sentiment from the  Friends stamp set,  matted it on black cardstock & glued it down to the card base.

Hope you like my card... 
Thank you for visiting today  :)